The 4th of July is a time to gather with family and friends, enjoy the warm summer days, and celebrate the birth of our nation. What better way to get into the patriotic spirit than by creating some fun and festive 4th of July crafts with your kids?
These easy projects are perfect for adding a splash of red, white, and blue to your Independence Day celebrations. Whether you’re planning a backyard barbecue or a cozy family day at home, these crafts will keep little hands busy and bring joy to your holiday.
In a Nutshell
- Patriotic Pinwheels are a delightful way to celebrate the 4th of July, combining simple paper crafting with festive red, white, and blue colors to create spinning decorations that are fun for kids to make and play with.
- Firework Salt Paintings provide a creative and sparkly alternative to traditional fireworks, allowing kids to use glue, salt, and liquid watercolors to design their own dazzling firework displays on paper.
- Star-Spangled Slime offers a hands-on, sensory experience with a patriotic twist, using easy-to-find ingredients to produce stretchy, tri-colored slime that kids will enjoy squishing and shaping.
- Independence Day Giant Paper Flowers: Make large, vibrant flowers in red, white, and blue. These stunning oversized flowers are perfect for decorating, adding a bold and festive touch to your 4th of July festivities.
These crafts are not only fun and engaging but also add a festive flair to your 4th of July celebrations, making them perfect for family activities and creative play.
Craft: Patriotic Pinwheels

Spin into the 4th of July Fun!
Pinwheels are a classic summer toy that can be made extra special with a patriotic twist. These colorful spinners will catch the summer breeze and add a touch of magic to your festivities. Plus, they’re super easy to make!
Supplies Needed:
- Colored Construction Paper or Cardstock: Choose red, white, and blue for a patriotic theme.
- Ruler and Pencil: For measuring and marking.
- Scissors: To cut the paper.
- Push Pin or Thumbtack: To secure the pinwheel to the stick.
- Wooden Dowel or Straw: For the pinwheel handle.
- Glue Stick: To attach the paper pieces.
- Decorative Stickers or Stars (optional): For extra decoration.
Step-by-Step Instructions:
- Prepare the Paper:
- Cut a square from your construction paper or cardstock. A common size is 6×6 inches, but you can make it larger or smaller depending on your preference.
- For a patriotic look, you can use patterned paper or alternate between red, white, and blue squares.
- Draw the Diagonals:
- Using a ruler, draw diagonal lines from each corner to the opposite corner to form an “X” in the center of the square.
- Mark the center where the lines intersect.
- Cut Along the Lines:
- Cut along each diagonal line, stopping about an inch from the center mark. This will create the four “arms” of the pinwheel.
- Form the Pinwheel:
- Gently bring one corner from each cut section towards the center point. You will be bringing in four points (one from each section).
- Overlap these points at the center and hold them in place. You can use a dab of glue to temporarily secure them if needed.
- Attach the Pinwheel to the Handle:
- Use a push pin or thumbtack to secure the overlapping points at the center to the wooden dowel or straw. Make sure the pinwheel can spin freely.
- If using a dowel, gently push the pin through the paper and into the dowel. If using a straw, ensure the pin or thumbtack goes through all the layers and secures well to the straw.
- Add Decorative Elements (Optional):
- For extra flair, you can add stickers, stars, or other decorations to the pinwheel blades.
- You can also decorate the handle with paint or tape.
- Final Adjustments:
- Make sure all the points are secured and that the pinwheel spins easily on its handle.
- Adjust as needed to ensure it’s balanced and spins well when blown on or held in the wind.
- Display or Use Your Pinwheel:
- Your 4th of July pinwheel is now ready to be used as a decoration or enjoyed as a toy. It’s perfect for celebrating Independence Day with a bit of homemade fun.
Tips:
- Double-Sided Paper: Using double-sided patterned paper can give a more vibrant look when the pinwheel spins.
- Sharp Tools: Be careful when using sharp tools like push pins and scissors, especially if kids are involved in the craft.
- Size Variation: Experiment with different sizes of squares to create a variety of pinwheel sizes.
This craft is easy and fun, making it a great activity for kids and adults alike. It’s perfect for adding a festive touch to your 4th of July celebrations.
For a visual guide, watch the full tutorial on the Bee Kreative Youtube Channel.
Now you have a wonderful spinning pinwheel to celebrate the 4th of July!
Firework Salt Paintings: 4th of July Crafts

Sparkle and Shine with DIY Fireworks!
Fireworks are a staple of any 4th of July celebration. This craft lets kids create their own dazzling displays using simple materials. It’s a little bit messy, but that’s part of the fun!
Supplies Needed:
- Black Construction Paper: Provides a dark background to make the colors pop.
- Table Salt: Ordinary table salt works great for this craft.
- White Glue: Standard school glue or any liquid glue.
- Watercolor Paints: Vibrant colors work best.
- Paintbrush: A thin brush for applying paint.
- Pencil: For drawing the initial fireworks design.
Step-by-Step Instructions:
- Draw the Fireworks Design:
- Using a pencil, lightly sketch out the shapes of fireworks bursts on the black construction paper. You can draw starbursts, circles, or any other pattern you like.
- Apply Glue to the Design:
- Carefully trace over your pencil lines with white glue. Make sure to follow the design lines closely.
- Apply the glue generously but not too thickly, as you will need it to hold the salt in place.
- Add Salt to the Glue:
- Immediately after applying the glue, sprinkle table salt over the glue lines. Cover all the glue completely with salt.
- Gently shake off any excess salt by lifting the paper and tapping it slightly. The salt should stick to the glue, forming the outline of your fireworks.
- Prepare Your Watercolors:
- While the glue is still wet, prepare your watercolor paints. Mix vibrant colors with a bit of water to make them easy to pick up with the paintbrush.
- Paint the Salt Lines:
- Dip your paintbrush into the watercolor and gently touch the salted lines. The salt will absorb the paint, creating a beautiful, spreading effect.
- You can use multiple colors on each firework to make them more vivid and dynamic. The colors will blend slightly as they spread through the salt.
- Let It Dry:
- Allow the glue and paint to dry completely. This may take a few hours, depending on how much glue and paint were used.
- Once dry, the salt fireworks will have a textured, colorful appearance.
- Display Your Artwork:
- Your salt fireworks art is now ready to be displayed. Hang it up or use it as a decoration for a festive event.
Tips:
- Color Choices: Use bright and contrasting colors to make your fireworks stand out against the black background.
- Precision: Be careful while applying paint to the salt; too much water can dissolve the glue.
- Experimentation: Try different shapes and sizes of fireworks to create a dynamic display.
This project is a great way to explore art and celebrate with a creative twist. Enjoy making your salt fireworks!
For a visual guide, you can watch the full tutorial on the DIY with Ollie YouTube Channel.
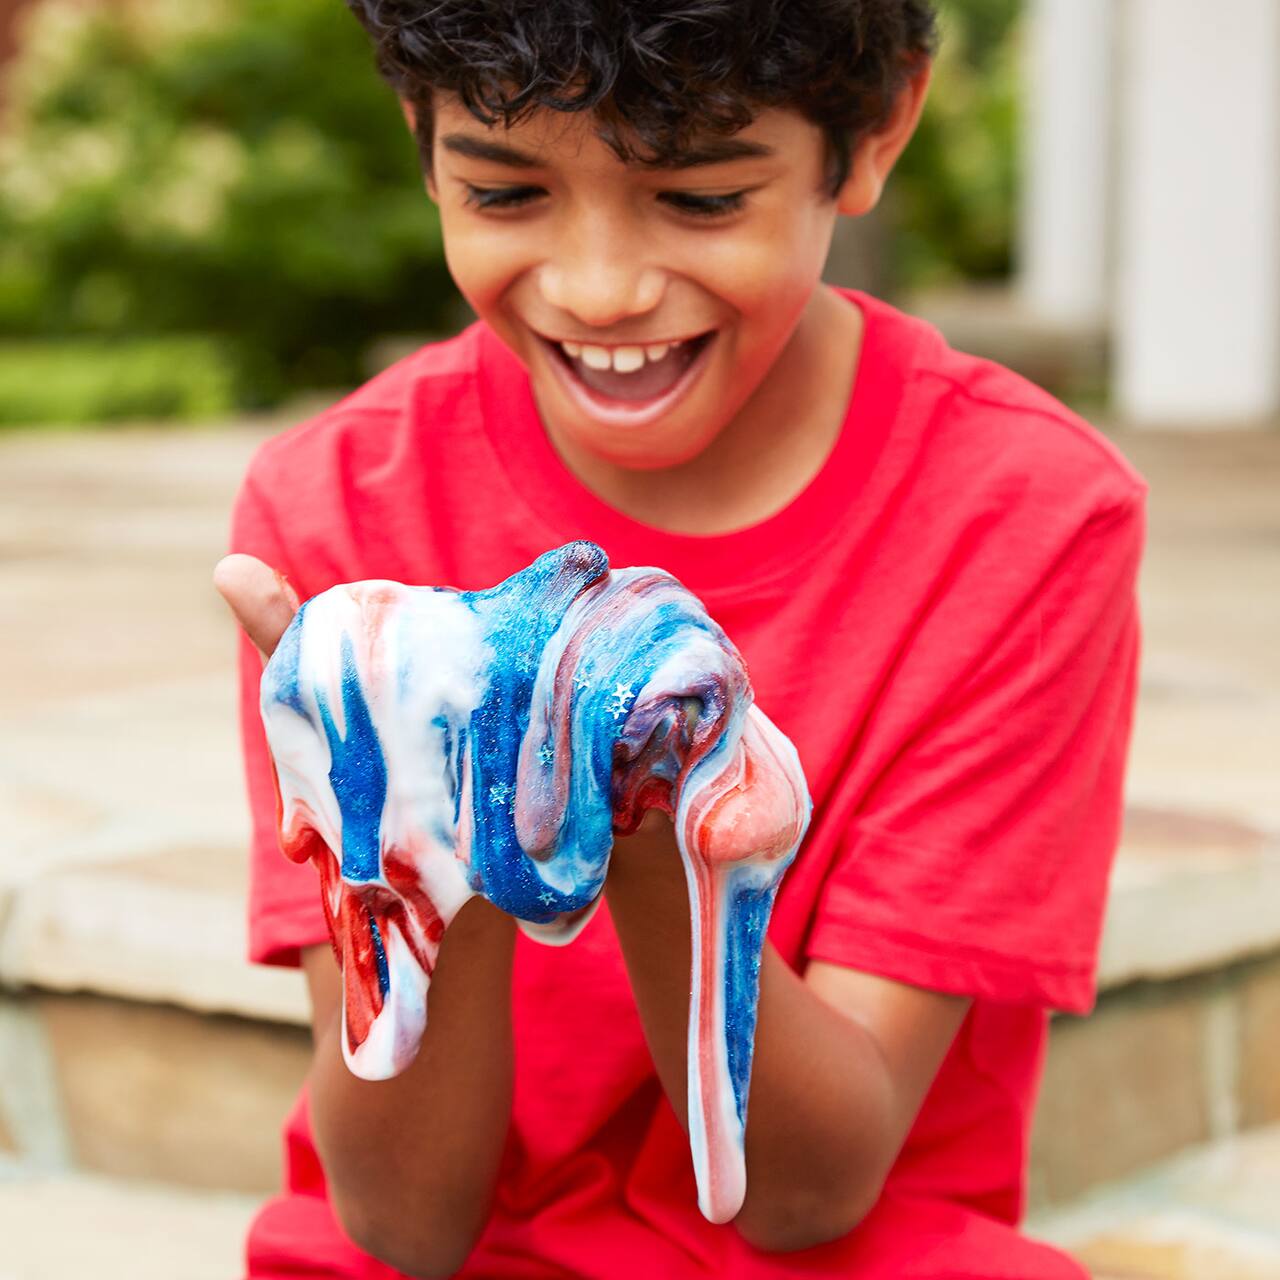
Craft: Star-Spangled Slime

Get Slimy with Patriotic Colors!
Kids love slime, and this red, white, and blue version is perfect for 4th of July fun. It’s easy to make and provides hours of squishy entertainment.
Supplies Needed:
- Elmer’s White Glue: About 4 oz (1/2 cup) for each batch of slime.
- Shaving Cream: Provides the fluffy texture.
- Corn Starch: Helps to thicken the slime.
- Foaming Hand Soap: Adds more fluff and a pleasant scent.
- Food Coloring: Red and blue for the patriotic colors.
- Mixing Bowls and Spoons: Separate bowls for each color.
- Measuring Cups and Spoons: For accurate measurement.
- Saline Solution (or Contact Lens Solution): Contains boric acid and sodium borate, which help to activate the slime.
Step-by-Step Instructions:
- Prepare the Glue Base:
- Pour 4 oz (about 1/2 cup) of Elmer’s white glue into a mixing bowl. This will be the base for your slime.
- Add Shaving Cream:
- Add about 1 cup of shaving cream to the glue. This gives the slime a fluffy, foamy texture.
- Stir the mixture until the glue and shaving cream are thoroughly combined.
- Add Foaming Hand Soap:
- Pump a generous amount of foaming hand soap into the bowl (about 1/2 cup). This not only adds volume but also gives the slime a nice scent.
- Mix well until the hand soap is fully integrated into the mixture.
- Add Corn Starch:
- Add 1/2 cup of corn starch to the mixture. This will help to thicken the slime and make it less sticky.
- Stir until the corn starch is fully mixed in and the texture starts to thicken.
- Color the Slime:
- Divide the mixture into two or three separate bowls if you want to create different colors.
- Add a few drops of red food coloring to one portion and blue to another. Leave one portion white if you prefer.
- Mix each bowl until the color is evenly distributed.
- Activate the Slime:
- Gradually add the saline solution to each bowl. Start with 1 tablespoon and add more as needed. The mixture will start to come together and become less sticky.
- Keep stirring and adding saline solution until the slime begins to pull away from the sides of the bowl and can be handled without sticking to your fingers.
- Knead the Slime:
- Take the slime out of the bowl and knead it with your hands. This will help it become smooth and stretchy.
- If the slime is too sticky, add a bit more saline solution and continue kneading.
- Combine the Colors (Optional):
- If you want a tri-colored effect, you can gently combine the red, white, and blue slimes. Be careful not to over-mix to keep the colors distinct.
- You can also keep the colors separate for individual play.
- Store the Slime:
- Place the finished slime in an airtight container or plastic bag to keep it fresh for future use.
Tips:
- Adjusting Consistency: If your slime is too runny, add a bit more corn starch. If it’s too stiff, add a little more glue or shaving cream.
- Supervision: Always supervise young children when making and playing with slime.
- Decoration: Add glitter or small decorative items for extra flair.
- Storage: Store the slime in an airtight container when not in use to keep it fresh and ready for more play.
Visual Guide:
For a visual step-by-step, you can watch the full tutorial on the Grandma and Me YouTube Channel.
Giant Flower Crafts for 4th of July
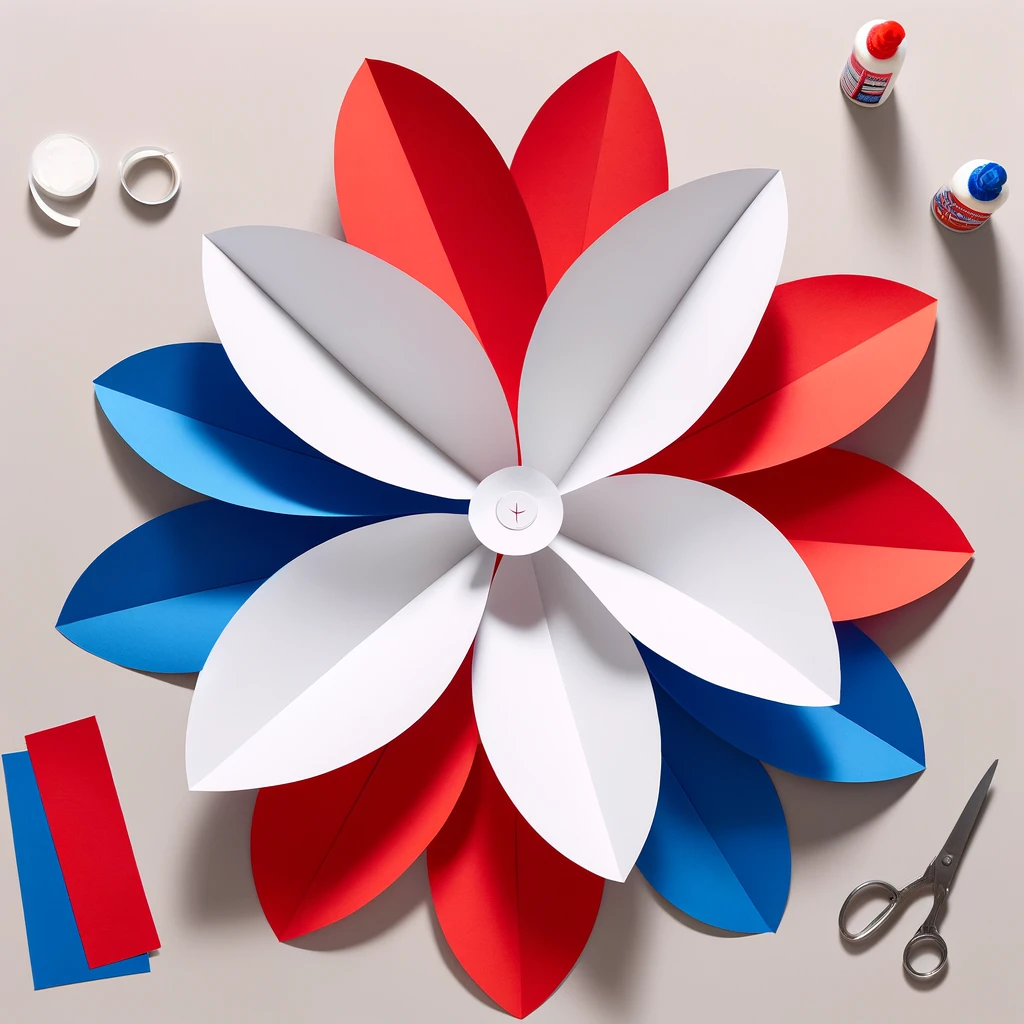 Adding a floral touch to your Independence Day celebrations is both festive and fun. Here’s how you can create beautiful 4th of July flower crafts that are perfect for decorating your home or for kids to enjoy making.
Materials Needed:
- Construction Paper: Choose three different colors for variety.
- Scissors: For cutting the paper.
- Glue Stick or Hot Glue Gun: To assemble the flower.
- Pencil and Ruler: For measuring and drawing the petal shapes.
- Circular Base: A small circle of paper to use as the center of the flower.
Steps:
- Select Your Colors:
- Pick three colors of construction paper for the petals. For a patriotic theme, you might use red, white, and blue.
- Draw and Cut the Petals:
- Using a pencil and ruler, draw half-circle shapes on the construction paper. These will be your petals. Each petal should be of the same size for a balanced look.
- Cut out the petals. You will need six petals to recreate the design from the image.
- Form the Petal Layers:
- Arrange the petals in a circular pattern, alternating the colors. This creates a visually appealing effect and mimics the pinwheel design from the image.
- Slightly overlap the edges of the petals at the center where they meet.
- Create the Flower Center:
- Cut out a small circle from construction paper. This will be used to cover the overlapping sections at the center and hold the petals together.
- Glue this circle over the center of the arranged petals.
- Secure the Petals:
- Use a glue stick or hot glue gun to attach the petals to the center circle. Ensure each petal is securely glued at the base.
- Press firmly and allow the glue to dry to ensure stability.
- Final Adjustments:
- Once the glue is dry, adjust the petals to ensure they are evenly spaced and properly aligned.
- If any petals feel loose, apply a bit more glue and press them down.
- Display Your Flower:
- Your giant paper flower can be used as a wall decoration, part of a backdrop, or even a table centerpiece. Attach a string to the back if you want to hang it.
Tips:
- Uniform Size: Make sure all your petals are of the same size for a symmetrical flower.
- Layering Effect: You can create more layers by adding more petals, arranging them in concentric circles.
- Color Variety: Experiment with different color combinations to match the theme of your event or decor.
Circling Back Around
Making crafts with your kids on the 4th of July is a fantastic way to bond and create lasting memories. Whether you’re spinning patriotic pinwheels, painting sparkling salt fireworks, or getting hands-on with star-spangled slime, these activities are sure to delight. They bring a vibrant touch to your Independence Day celebrations and allow children to express their creativity. So gather your supplies, let your imagination run wild, and enjoy a fun-filled holiday with these easy and entertaining crafts!